System - DSS 6 | Data Source Solutions Documentation
Documentation: System - DSS 6 | Data Source Solutions Documentation
System
The System page is a place where you can configure and manage the DSS Hub System. The page contains the following tabs:
Managing System
On the System page, you can also manage the following system settings:
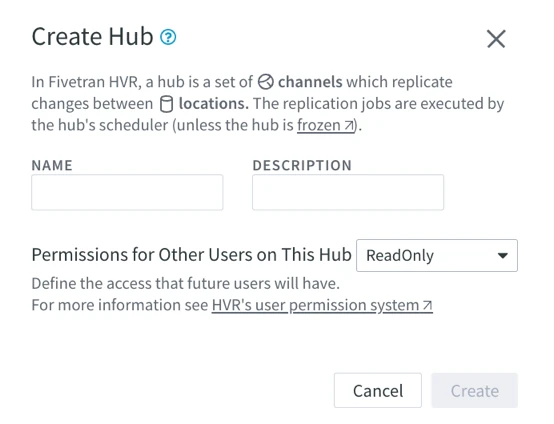
Create Hub
Only users with SysAdmin and HubCreation permissions can create a hub.
To create a new hub:
-
Click the Create Hub button at the top right.
-
In the Create Hub dialog, specify the name for the hub and optionally a description.
Hub names must consist of lowercase identifiers: ASCII letters, digits, and underscore '_'. Hub names must not start with a digit.
- Click Create. The Start Page associated with the new hub will open where you can create a replication channel or add locations.
Restore Hub From Snapshot
Only users with SysAdmin and HubCreation permissions can restore a hub from a hub snapshot.
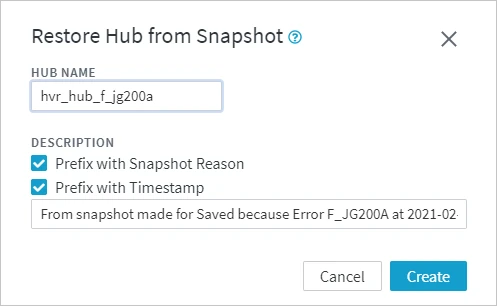
Option Restore Hub from Snapshot restores a hub from a hub snapshot. The hub snapshot is a zipped file created using option Save Hub Snapshot. The name of the restored hub must be unique within the database repository. The restored hub is created in the frozen state.
The Restore Hub from Snapshot option corresponds to the dsssnapshotrestore CLI command.
To restore a hub from a hub snapshot:
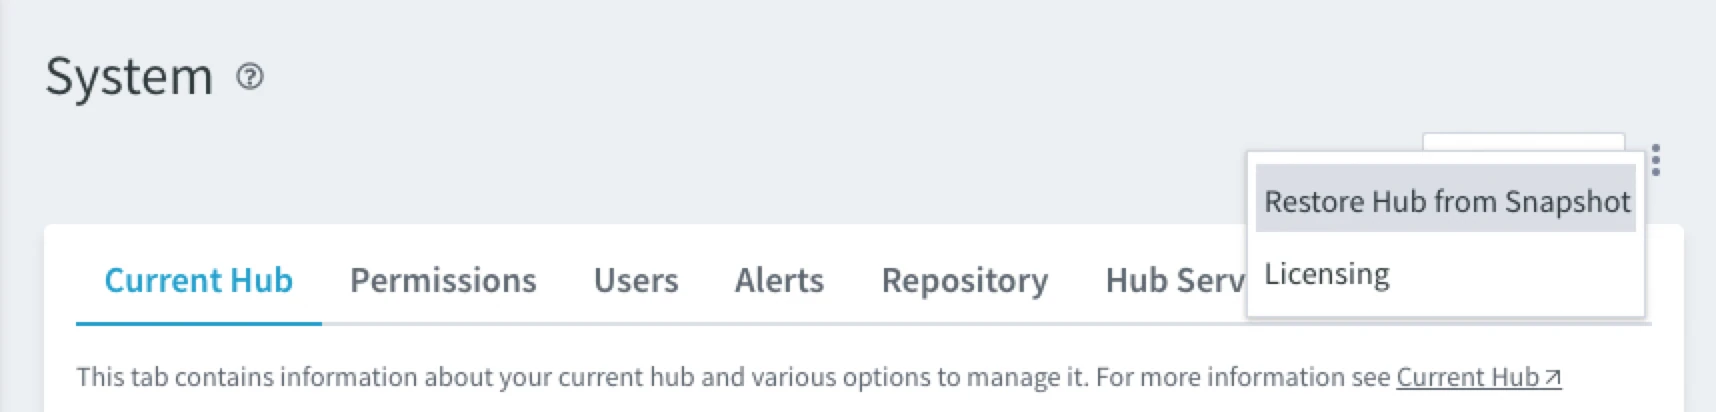
-
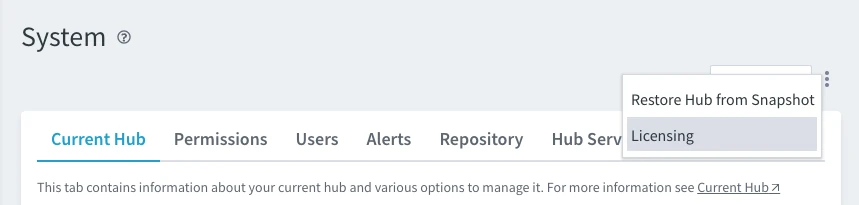
Click the More Options icon
 at the top right of the System page and select Restore Hub from Snapshot.
-
Browse for the required snapshot file and click Open.
-
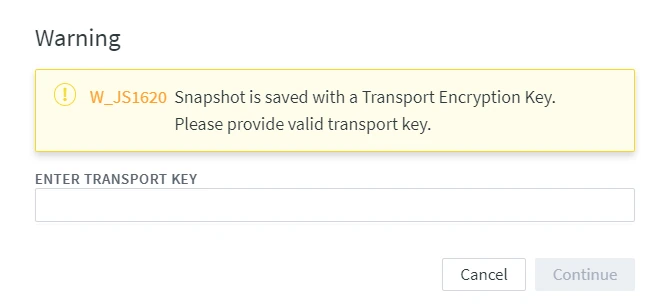
For the hub snapshot saved with a transport encryption key, specify the key in the ENTER TRANSPORT KEY field and click Continue.
-
In the Restore Hub from Snapshot dialog, specify the name of the restored hub and select the required options for the description of the snapshot.
-
Click Create.
After successfully restoring the hub, you can switch to the hub using the Switch Hub dialog. To access the dialog, click
 SWITCH HUB at the bottom of the left sidebar.
Licensing
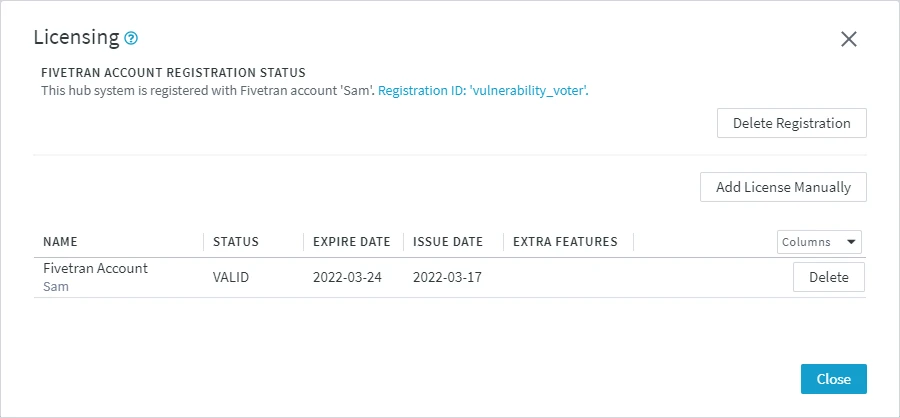
Option Licensing allows you to manage the Data Source Solutions DSS license for the current hub system. This includes creating/deleting the Data Source Solutions account registration, adding/deleting the license(s), viewing the Data Source Solutions account registration details such as account name and registration ID, and viewing the license details such as license validity status, expiry date etc. A license must be supplied either by registering the hub system with the Data Source Solutions account or by manually adding the license file (.lic). For more information on licenses, see section Licensing.
To manage the Data Source Solutions DSS licenses on the Command Line Interface (CLI), see command dsslicense.
The Licensing dialog can be accessed by clicking the More Options icon
at the top right of the System page and select Licensing.
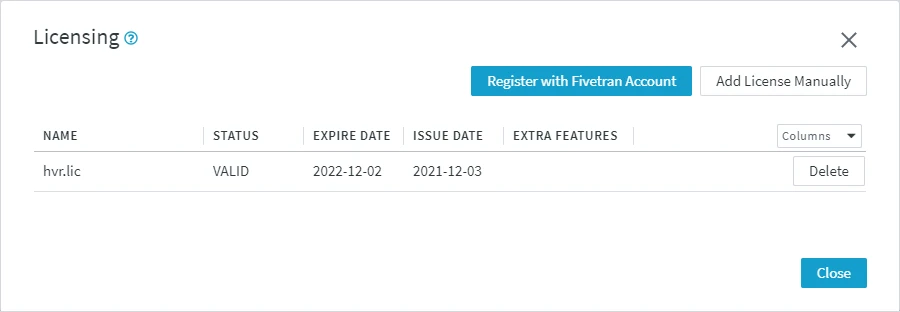
Registering with Data Source Solutions Account
<b>Since</b> v6.1.0/3You can register the hub system with Data Source Solutions to obtain licenses for the Consumption-based licensing model.
To register with Data Source Solutions account and acquire a license:
- In the Licensing dialog, click Register with Data Source Solutions Account.
- On the Data Source Solutions account creation page,
- If you already have a Data Source Solutions account,
- Log in to Data Source Solutions account using your Data Source Solutions login credentials.
- In the Complete registration dialog, click Continue to DSS. You will be redirected back to the web user interface. The current hub system will get registered and Data Source Solutions will send the license to the hub system.
- If you do not have a Data Source Solutions account:
- Specify the user and company details in the registration form. All fields are mandatory.
- Click Sign up.
- You will receive an email from Data Source Solutions to confirm your email address. In this verification email, click Verify your Account.
- In the Complete registration dialog, click Continue to DSS. You will be redirected back to the web user interface. The current hub system will get registered and Data Source Solutions will send the license to the hub system.
- If you already have a Data Source Solutions account,
To manage your Data Source Solutions account or view billing and usage, click the Registration ID displayed in the Licensing dialog. For more information about using the Data Source Solutions dashboard and managing your account, see Account Settings in the Data Source Solutions documentation.
Adding License Manually
To manually add the license file received from the Data Source Solutions's Technical Support team:
The license file must be available on your system.
- In the Licensing dialog, click Add License Manually.
- Browse and select the license file (.lic) and click Open. The license will be added to the current hub system.
Deleting License
To delete a license:
- Click Delete displayed in the respective license's row.
- Click OK in the confirmation dialog.
Deleting Data Source Solutions Account Registration
To delete the Data Source Solutions account registration for the current hub system:
- Click Delete Registration.
- Click OK in the confirmation dialog.
Deleting a Data Source Solutions account registration only removes the account registration information from the current hub's repository. This will not delete the Data Source Solutions account itself.
However, deleting a Data Source Solutions account registration will immediately stop uploading the Monthly Active Rows (MAR) data, and the auto-renewal of the license will be canceled, causing the license to expire after seven days.
Acquiring Data Source Solutions Account License
If a license that was added using the Data Source Solutions account is deleted, you can fetch that license from your Data Source Solutions account by clicking Acquire Data Source Solutions Account License. The option to acquire a Data Source Solutions account license is not displayed if the Data Source Solutions account registration is already deleted using the Delete Registration option.
Viewing or Accessing Data Source Solutions Account
To manage your Data Source Solutions account or view your billing and usage, click on the Registration ID displayed in the Licensing dialog. For more information about using the Data Source Solutions dashboard and account management, see Account Management in Data Source Solutions documentation.
- Click Create. The Start Page associated with the new hub will open where you can create a replication channel or add locations.