Staging for Snowflake - DSS 6 | Data Source Solutions Documentation
Documentation: Staging for Snowflake - DSS 6 | Data Source Solutions Documentation
Staging for Snowflake
While running Burst Integrate or Bulk Refresh, Data Source Solutions DSS can put data into a temporary directory (‘staging file') before loading data into a target database. For more information about staging files on Snowflake, see Snowflake Documentation.
For best performance, DSS performs Burst Integrate and Bulk Refresh into Snowflake using staging files. DSS implements the file staging in Snowflake as follows:
- DSS first writes data into the staging directory on the configured platform. Since 6.2.5/4, the staging files can be stored in CSV or Parquet format. The following interfaces are used by DSS on each platform for staging data: - Snowflake Internal Staging using Snowflake ODBC driver - AWS or Google Cloud Storage using cURL library - Azure Blob FS using HDFS-compatible libhdfs API 2. DSS then uses the Snowflake SQL command `copy into` to ingest data into the Snowflake target tables from the staging directory.
Known issues with Parquet: Dates and timestamps before year 1583 can be replicated incorrectly due to the shift from the Gregorian to the Julian calendar.
DSS supports the following platforms for staging files:
- Snowflake Internal Staging
- Snowflake on AWS
- Snowflake on Azure
- Snowflake on Google Cloud Storage
Snowflake Internal Staging
DSS can stage data on the Snowflake internal staging before loading it into Snowflake while performing Burst Integrate and Bulk Refresh. For more information about Snowflake internal staging, refer to the Snowflake Documentation.
To use the Snowflake internal staging, while creating a location or by editing the existing location's source and target properties deselect the Integrate Staging Directory option in the User Interface (same as not defining the location property Staging_Directory) on the corresponding integrate/target location.
Snowflake on AWS
DSS must be configured to stage the data on AWS S3 before loading it into Snowflake. For staging the data on AWS S3 and perform Burst Integrate and Bulk Refresh, the following are required:
-
An AWS S3 location (bucket) to store temporary data to be loaded into Snowflake. For more information about creating and configuring an S3 bucket, refer to the AWS Documentation.
-
An AWS user with AmazonS3FullAccess permission policy to access the S3 bucket. Alternatively, an AWS user with minimal set of permission can also be used:
Click here for minimal set of permissions.
- s3:GetBucketLocation
- s3:ListBucket
- s3:ListBucketMultipartUploads
- s3:AbortMultipartUpload
- s3:GetObject
- s3:PutObject
- s3:DeleteObject
Sample JSON with a user role permission policy for S3 location
{
    "Statement": [
        {
            "Sid": <identifier>,
            "Effect": "Allow",
            "Principal": {
                    "AWS": "arn:aws:iam::<account_id>:<user>/<username>",
            },
            "Action": [
                    "s3:GetObject",
                    "s3:GetObjectVersion",
                    "s3:PutObject",
                    "s3:DeleteObject",
                    "s3:DeleteObjectVersion",
                    "s3:AbortMultipartUpload"
            ],
            "Resource": "arn:aws:s3:::<bucket_name>/*"
        },
        {
            "Sid": <identifier>,
            "Effect": "Allow",
            "Principal": {
                    "AWS": "arn:aws:iam::<account_id>:<user>/<username>"
            },
            "Action": [
                    "s3:ListBucket",
                    "s3:GetBucketLocation",
                    "s3:ListBucketMultipartUploads"
            ],
            "Resource": "arn:aws:s3:::<bucket_name>"
        }
    ]
}
For minimal permission, DSS also supports the AWS temporary security credentials in IAM. There are two ways to request for the AWS Security Token Service (STS) temporary credentials:
-
Using a combination of AWS STS Role ARN, AWS Access Key Id, and AWS Secret Access Key
Sample JSON
{ "Version": "2012-10-17", "Statement": [ { "Sid": "", "Effect": "Allow", "Principal": { "AWS": "arn:aws:iam::<account_id>:<user>/<username>" }, "Action": "sts:AssumeRole" } ] } -
Using a combination of AWS STS Role ARN and AWS IAM Role (a role that has access to an EC2 machine)
Sample JSON
{
     "Version": "2012-10-17",
      "Statement": [
          {
               "Sid": "",
               "Effect": "Allow",
               "Principal": {
                        "AWS": [
                              "arn:aws:iam::<account_id>:<user>/<username>",
                              "arn:aws:iam::<account_id>:<role>/<username>"
                         ]
                },
               "Action": "sts:AssumeRole"
          }
     ]
 }
For more information on the Amazon S3 permissions policy, refer to the AWS S3 documentation.
For more information, refer to the following AWS documentation:
-
Define the following location properties (while creating a location or by editing the existing location's source and target properties) for the Snowflake location:
- The Location Property equivalent to the UI field is shown inside (bracket) below.
- If the managed secrets feature is enabled, option USE TOKEN INSTEAD is displayed in the fields designated for entering secrets.
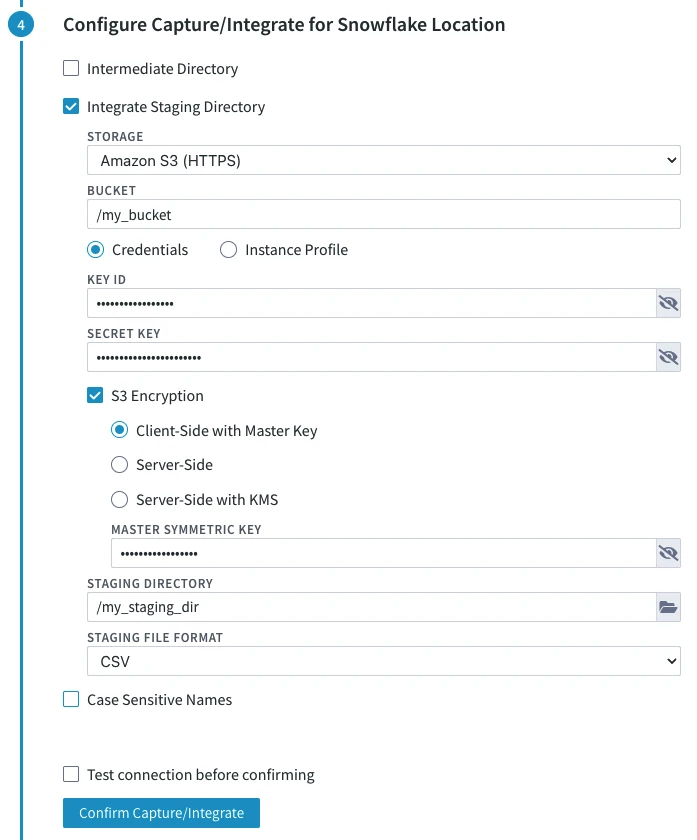
1.  **STORAGE** ([**File_Scheme**](/docs/dss6-property-reference-location-properties#filescheme)): protocol for connecting DSS to S3.

    Select either of the following options:

    -   **Amazon S3 (HTTPS)**
    -   **Amazon S3 (HTTP)**

2.  **BUCKET** ([**S3_Bucket**](/docs/dss6-property-reference-location-properties#s3bucket)): Name or IP address of the Amazon S3 bucket.

3.  **Credentials** or **Instance Profile**: AWS security credentials. For more information about getting your AWS credentials or Instance Profile Role, refer to the <a href="https://docs.aws.amazon.com/AWSEC2/latest/UserGuide/iam-roles-for-amazon-ec2.html" rel="nofollow">AWS Documentation</a>.
    -   If **Credentials** is selected, the location property **KEY ID** ([**AWS_Access_Key_Id**](/docs/dss6-property-reference-location-properties#awsaccesskeyid)) and **SECRET KEY** ([**AWS_Secret_Access_Key**](/docs/dss6-property-reference-location-properties#awssecretaccesskey)) must be supplied.
        -   **KEY ID:** Access key ID of IAM user for connecting DSS to Amazon S3.

        -   **SECRET KEY:** Secret access key of IAM user for connecting DSS to Amazon S3.
    -   If **Instance Profile** is selected, the location property **IAM ROLE** ([**AWS_IAM_Role**](/docs/dss6-property-reference-location-properties#awsiamrole)) must be supplied.
        -   **IAM ROLE:** AWS IAM role name for connecting DSS to Amazon S3.

4.  Optionally, **S3 Encryption** can be enabled. For more information about S3 data encryption, refer to the <a href="https://docs.aws.amazon.com/AmazonS3/latest/userguide/UsingEncryption.html" rel="nofollow">AWS Documentation</a>.

    The available options are:

    -   **Client-Side with Master Key**: Enables client-side encryption using a master symmetric key for AES. The **MASTER SYMMETRIC KEY** ([**S3_Encryption_Master_Symmetric_Key**](/docs/dss6-property-reference-location-properties#s3encryptionmastersymmetrickey)) must be supplied for this encryption method.

    -   **Server-Side** ([**S3_Encryption_SSE**](/docs/dss6-property-reference-location-properties#s3encryptionsse)): Enables server-side encryption with Amazon S3 managed keys.

    -   **Server-Side with KMS** ([**S3_Encryption_SSE_KMS**](/docs/dss6-property-reference-location-properties#s3encryptionssekms)): Enables server-side encryption with customer master keys (CMKs) stored in AWS key management service (KMS). If **CUSTOMER MASTER KEY ID** ([**S3_Encryption_KMS_Customer_Master_Key_Id**](/docs/dss6-property-reference-location-properties#s3encryptionkmscustomermasterkeyid)) is not specified, a KMS managed CMK is used.

5.  **STAGING DIRECTORY** ([**Staging_Directory**](/docs/dss6-property-reference-location-properties#stagingdirectory)): location where DSS will create the temporary staging files inside the S3 bucket (e.g. **/my_staging_dir**).
6. Since **6.2.5/4**, in the **STAGING FILE FORMAT** drop-down menu ([**Staging_File_Format**](/docs/dss6-property-reference-location-properties#stagingfileformat)), select the format for storing the staging files:
    - **CSV**
    - **Parquet**
       <div class="callout callout-important">
Known issues with Parquet: Dates and timestamps before year 1583 can be replicated incorrectly due to the shift from the Gregorian to the Julian calendar.
- The Location Property equivalent to the UI field is shown inside (bracket) below.
Sample screenshot
By default, DSS connects to us-east-1 once for determining your S3 bucket region. If a firewall restriction or a service such as Amazon Private Link is preventing the determination of your S3 bucket region, you can change this region (us-east-1) to the region where your S3 bucket is located by defining the following action:
| Group | Table | Action/Parameter(s) |
|---|---|---|
| Snowflake | * | Environment - Name=DSS_S3_BOOTSTRAP_REGION, Value=s3_bucket_region |
Snowflake on Azure
Due to technical limitations, external staging on Azure for Snowflake is not supported in the DSS releases since 6.1.5/3 to 6.1.5/9.
DSS must be configured to stage the data on Azure BLOB storage before loading it into Snowflake. For staging the data on Azure BLOB storage and perform Burst Integrate and Bulk Refresh , the following are required:
-
An Azure BLOB storage location (container) to store temporary data to be loaded into Snowflake.
-
An Azure user (storage account) to access the container. For more information, refer to the Azure Blob storage documentation.
-
Define the following location properties (while creating a location or by editing the existing location's source and target properties) for the Snowflake location:
- The Location Property equivalent to the UI field is shown inside (bracket) below.
- If the managed secrets feature is enabled, option USE TOKEN INSTEAD is displayed in the fields designated for entering secrets.
1.  **STORAGE** ([**File_Scheme**](/docs/dss6-property-reference-location-properties#filescheme)): Protocol for connecting DSS to Azure.
    Select either of the following options:
    -   **Azure Storage (HTTPS)**
    -   **Azure Storage (HTTP)**
2.  **ACCOUNT** ([**WASB_Account**](/docs/dss6-property-reference-location-properties)): Name of the Azure Blob Storage account.
3.  **CONTAINER** ([**WASB_Container**](/docs/dss6-property-reference-location-properties#wasbcontainer)): Name of the container available within the Azure Blob Storage account.
4.  **SECRET KEY** ([**Azure_Shared_Secret_Key**](/docs/dss6-property-reference-location-properties#azuresharedsecretkey)): Access key of the Azure storage **ACCOUNT**.
5.  **STAGING DIRECTORY** ([**Staging_Directory**](/docs/dss6-property-reference-location-properties#stagingdirectory)): Location where DSS will create the temporary staging files inside the Azure container (e.g. **/my_staging_dir**).
6. Since 6.2.5/4, in the **STAGING FILE FORMAT** drop-down menu ([**Staging_File_Format**](/docs/dss6-property-reference-location-properties#stagingfileformat)), select the format for storing the staging files:
    - **CSV**
    - **Parquet**
          <div class="callout callout-important">
Known issues with Parquet: Dates and timestamps before year 1583 can be replicated incorrectly due to the shift from the Gregorian to the Julian calendar.
- The Location Property equivalent to the UI field is shown inside (bracket) below.