SSO Using Google Workspace - DSS 6 | Data Source Solutions Documentation
Documentation: SSO Using Google Workspace - DSS 6 | Data Source Solutions Documentation
SSO Using Google Workspace
Since v6.2.5/2
This section describes the steps to set up Single Sign-On (SSO) for DSS using Google Workspace with SAML authentication.
The setup procedure involves configuring the DSS, setting up a custom SAML application in Google Workspace, and completing the configuration on the DSS.
Prerequisites
Before setting up SSO for DSS using Google Workspace, ensure you have the following:
- DSS Hub installed with HTTPS enabled
- DSS Hub initial setup is completed
- Google Workspace and DSS accounts with administrative access
Setup instructions
Set Up DSS
Prepare the DSS environment for Single Sign-On (SSO) by configuring essential settings and generating metadata.
Configure Public Hostname
Set the fully qualified domain name (FQDN) for the DSS Hub Server to ensure it is publicly accessible for SAML-based authentication.
To set the public hostname, use the command dsshubserverconfig:
dsshubserverconfig Public_Host=<em>fully-qualified-hostname</em>
(Optional) Configure SP Key Pair
By default, the DSS Hub Server automatically generates and configures the Service Provider (SP) key pair and X.509 certificate required to establish secure communication between the SP and the Identity Provider (IdP). This automatic generation is done when downloading the SP metadata or when the user tries to authenticate using SAML for the first time.
Perform this step only if you want to manually configure the SP key pair instead of using the automatically generated one.
Instructions to manually configure the SP key pair for SAML
You can configure the DSS Hub Server to use your own key pair and X.509 certificate or generate a new one.
- Configure using your own key pair (e.g.,
saml-sp.pub_cert,saml-sp.priv_key) and certificate using the dsshubserverconfig command:-
Configure without password:
dsshubserverconfig Saml_SP_Public_Certificate=@saml-sp.pub_cert Saml_SP_Private_Key=@saml-sp.priv_keyOptionally, you can set a password for the key pair.
-
Configure with password:
dsshubserverconfig Saml_SP_Public_Certificate=@saml-sp.pub_cert Saml_SP_Private_Key=@saml-sp.priv_key Saml_SP_Private_Key_Password=<em>password</em> -
Configure using a new key pair and certificate:
-
Generate a new key pair and certificate using the dsssslgen command:
dsssslgen saml-sp dsshubserver-samlSample output:
dsssslgen saml-sp dsshubserver-saml dsssslgen: Data Source Solutions DSS 6.2.6/0 (linux_glibc2.17-x64-64bit) dsssslgen: Generating SSL key pair... dsssslgen: Generating SSL key pair completed. dsssslgen: Certificate subject: 'DSS dsshubserver-saml' dsssslgen: Certificate contains 2048 bit RSA Public Key. dsssslgen: Certificate valid from Jan 6 18:03:18 2025 GMT dsssslgen: Certificate valid until Jan 1 18:03:18 2045 GMT dsssslgen: Public Certificate written to 'saml-sp.pub_cert'. dsssslgen: Private key written to 'saml-sp.priv_key'. dsssslgen: Private key password: rEscC7Lo3GihLb4HODNhX9xIJPR3yD6RCQU+JsJ/ dsssslgen: Example to configure High Volume Agent: dssagentconfig Agent_Server_Public_Certificate=@saml-sp.pub_cert Agent_Server_Private_Key=@saml-sp.priv_key Agent_Server_Private_Key_Password=rEscC7Lo3GihLb4HODNhX9xIJPR3yD6RCQU+JsJ/ dsssslgen: Example to configure Hub Server: dssreposconfig Agent_Client_Public_Certificate=@saml-sp.pub_cert Agent_Client_Private_Key=@saml-sp.priv_key Agent_Client_Private_Key_Password=rEscC7Lo3GihLb4HODNhX9xIJPR3yD6RCQU+JsJ/ <strong>dsssslgen: Example to configure SAML to Hub Server: dsshubserverconfig Saml_SP_Public_Certificate=@saml-sp.pub_cert Saml_SP_Private_Key=@saml-sp.priv_key Saml_SP_Private_Key_Password=rEscC7Lo3GihLb4HODNhX9xIJPR3yD6RCQU+JsJ/</strong> dsssslgen: Finished. (elapsed=0.238508s) -
From the dsssslgen command's output, copy the example command line after
Example to configure SAML to Hub Serverand execute it:dsshubserverconfig Saml_SP_Public_Certificate=@saml-sp.pub_cert Saml_SP_Private_Key=@saml-sp.priv_key Saml_SP_Private_Key_Password=<em>password</em>
-
-
-
Download SP Metadata
Retrieve the SP metadata file, which contains essential configuration details, to use in the Google Workspace setup.
To download the SP metadata file, use the URL - https://fully-qualified-hostname:https_port/auth/latest/saml/metadata
{% tabs %}
{% tab label="Web Browser" %}
Enter the URL https://<em>fully-qualified-hostname</em>:<em>https_port</em>/auth/latest/saml/metadata in the address bar of your browser.

{% /tab %}
{% tab label="CLI" %}
Run the wget Linux command with the URL:
wget https://<em>fully-qualified-hostname</em>:<em>https_port</em>/auth/latest/saml/metadata
If you are using a self-signed HTTPS certificate, use --no-check-certificate to ignore the Self-signed certificate encountered error.
wget --no-check-certificate https://<em>fully-qualified-hostname</em>:<em>https_port</em>/auth/latest/saml/metadata
{% /tab %}
{% /tabs %}
Get Entity ID and ACS URL
Extract key identifiers from the SP metadata file, such as the Entity ID and Assertion Consumer Service (ACS) URL, which are required for configuring the SAML application in Google Workspace.
-
Open the downloaded SP metadata file in a text viewer.
-
Make a note of the following values, they are required for creating a custom SAML application in the Google Workspace (step 2.1.8):
-
The entityID attribute of the EntityDescriptor element. This is the Entity ID in Google Workspace.

-
The Location attribute of the AssertionConsumerService element with Binding="urn:oasis:names:tc:SAML:2.0:bindings:HTTP-POST". This is the ACS URL in Google Workspace.

-
Set Up Google Workspace
Create and configure a custom SAML application in Google Workspace to integrate with DSS.
Create a Custom SAML Application
Add a new custom SAML application for DSS in Google Workspace and configure its basic details.
-
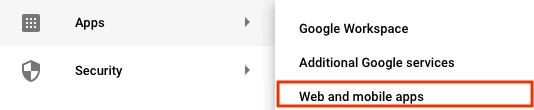
Log in to your Google Admin account and go to Apps ▶ Web and mobile apps.
-
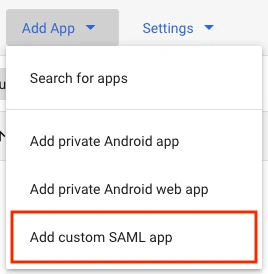
In the panel, click Add App.

-
Click Add custom SAML app.
-
Enter a name for the application (e.g., DSS).
-
Click Continue to switch to the Google Identity Provider details page.

-
Click DOWNLOAD METADATA to download the IdP metadata file and save it as saml-idp-metadata.xml.
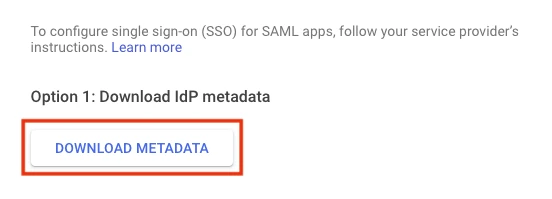
This file required to set the Saml_IDP_Metadata hub server property, while completing the DSS configuration (step 3.1).
-
Click Continue.
-
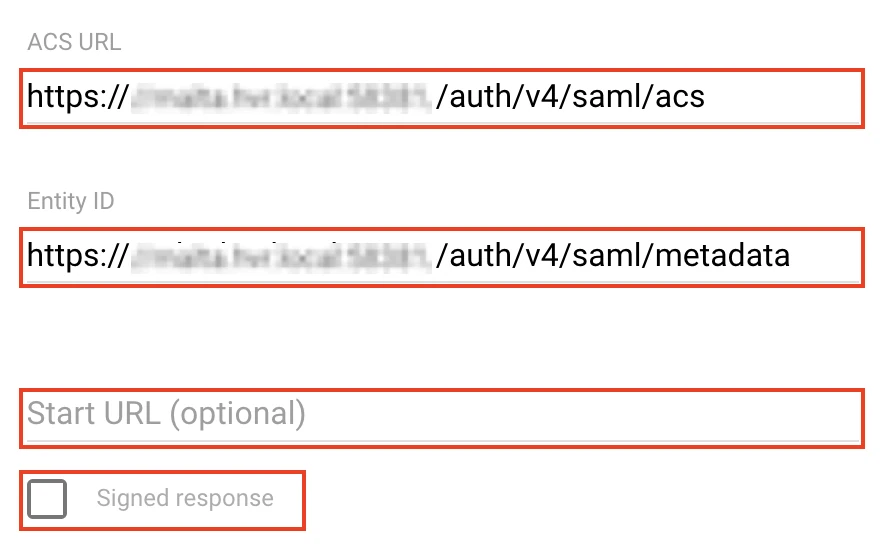
Under Server provider details, in the ACS URL and Entity ID fields, enter the values that you had noted down in step 1.4.
-
Leave the Start URL empty and the Signed response checkbox clear.
-
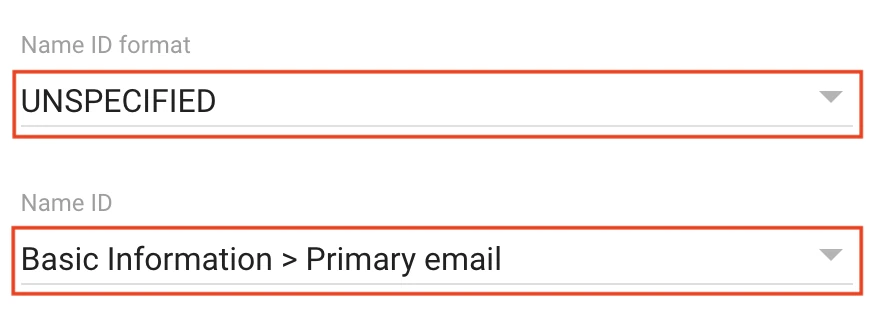
Set the Name ID format to UNSPECIFIED.
-
Set the Name ID to Basic Information > Primary email.
-
Click Continue to switch to the Attribute mapping page.
-
Click FINISH.
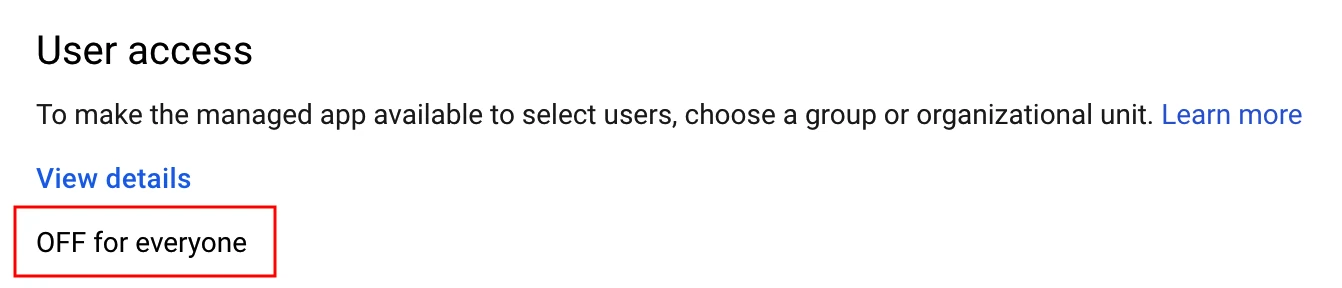
Enable User Access to the Custom SAML Application
Grant access to the custom SAML application for DSS users in Google Workspace.
-
By default, the custom SAML application created for DSS isn't accessible to users. Click OFF for everyone.
This example assumes that you are enabling the application access for everyone. To learn about applying policies to different users, refer to the Google's documentation.
-
Under Service status, select ON for everyone.
-
Click SAVE. Changes may take up to 24 hours to propagate to all users.

Complete DSS Configuration
Finalize SAML authentication on the DSS Hub Server by uploading IdP metadata, enabling authentication methods, and adding SAML users.
Upload IdP Metadata
Upload the metadata file downloaded from Google Workspace to the DSS server to establish trust with the Identity Provider (IdP).
-
Copy the saml-idp-metadata.xml that you downloaded (in step 2.1.6) to the server running the DSS Hub Server.
-
Configure the IdP metadata using the dsshubserverconfig command:
dsshubserverconfig Saml_IDP_Metadata=@saml-idp-metadata.xml
(Optional) Rename IdP Name
Configure the IdP Name using the command dsshubserverconfig:
dsshubserverconfig Saml_IDP_Name="Google"The default text for the SAML login button in the DSS UI is Sign in with SSO. The above command with the Saml_IDP_Name hub server property changes it to Sign in with Google.
Enable SAML Authentication
Enable SAML as the authentication method on the DSS Hub Server using the command dsshubserverconfig:
dsshubserverconfig Authentication_Method.saml=trueThis explicitly enables the SAML authentication. By default, password authentication is the only method implicitly enabled. When you explicitly enable any (e.g, SAML) authentication method, all others will be disabled unless explicitly re-enabled.
-
To explicitly re-enable password authentication, run:
dsshubserverconfig Authentication_Method.password=true
Few more commands related to enabling/disabling the authentication methods
-
To disable SAML authentication, run:
dsshubserverconfig Authentication_Method.saml=false -
To restore the default authentication method (i.e., password authentication), run:
dsshubserverconfig Authentication_Method=
Create SAML Users
Add SAML-based user in DSS to grant access via Single Sign-On.
{% tabs %}
{% tab label="DSS UI" %}
-
Login into the DSS UI using an administrator account.
-
On the left sidebar, click System.

-
On the System page, go to the Users tab.
-
Click Add User.

-
In the New User dialog, choose SAML user as AUTHENTICATION.
-
Specify the USERNAME and FULL NAME.

The USERNAME must match the Google Workspace email address.
- Click Save.
{% /tab %}
{% tab label="CLI" %}
To create a new SAML user from CLI, use the command dssuserconfig:
dssuserconfig -c -A saml <em>username</em>The USERNAME must match the Google Workspace email address.
{% /tab %}
{% /tabs %}
-