Setting up DSS Hub from CLI - DSS 6 | Data Source Solutions Documentation
Documentation: Setting up DSS Hub from CLI - DSS 6 | Data Source Solutions Documentation
Setting up DSS Hub from CLI
This section describes the steps to set up a DSS Hub System from the Command Line Interface (CLI), which includes specifying the connection details for the repository database, adding the license, configuring the hub system encryption wallet, creating a hub, creating the user(s) for accessing and operating DSS. Alternatively, you can also perform the hub system setup from a browser (UI). For more information, see Setting up DSS Hub from Browser.
Prerequisites
Following are the prerequisites for setting up the DSS Hub System:
-
Create a repository database before proceeding with the hub system setup. For the list of DBMSs supported as repository database, see section Repository Database in Capabilities. For the access privileges, and other configuration required for using the supported DBMS as repository database, see section Hub Repository Database Requirements. For example, an Oracle database can serve as a repository database.
Sample SQL statements to create a repository database in Oracle.
create user datasourcesolutions_demo
identified by datasourcesolutions
default tablespace users
temporary tablespace temp
quota unlimited on users;
Configure the privileges for the Oracle repository:
grant create session to datasourcesolutions_demo;
grant create table to datasourcesolutions_demo;
grant create trigger to datasourcesolutions_demo;
grant create procedure to datasourcesolutions_demo;
grant execute on dbms_alert to datasourcesolutions_demo;
- One of the following:
- For registering the DSS Hub System with a Data Source Solutions account (Consumption-based Pricing), the web browser must have access to datasourcesolutions.ai (35.236.237.87). Only Data Source Solutions accounts with the Account Administrator role can register a hub system.
- For adding the DSS license manually (Usage-based Subscription), the license file (.lic) must be available on your system.
Setting Up DSS Hub System
Perform the following steps to set up the DSS Hub System in CLI:
-
Configure the hub server properties by using the command dsshubserverconfig. You need to specify the parameters required for connecting the DSS Hub System to the DBMS where the hub repository resides.
dsshubserverconfig <em>set</em>_<em>hub_server_properties</em>Example configuration for all supported hub repository databases
For safety reasons, it is recommended to use @prompt for supplying password on the command line.
- Aurora MySQL ```plaintext dsshubserverconfig HTTP_Port=4340 Repository_Class=mysql Repository_Class_Flavor=aurora_my Database_Host=dss6-instance-1.xyzabc5w.eu-central-1.rds.amazonaws.com Database_Port=3306 Database_Name=repository_db Database_User=repository_db_user Database_Password=@prompt ``` - Aurora PostgreSQL ```plaintext dsshubserverconfig HTTP_Port=4340 Repository_Class=postgresql Repository_Class_Flavor=aurora_pq Database_Host=dss6-instance-1.xyzabc5w.eu-central-1.rds.amazonaws.com Database_Port=5432 Database_Name=repository_db Database_User=repository_db_user Database_Password=@prompt ``` - Azure SQL Database ```plaintext dsshubserverconfig HTTP_Port=4340 Repository_Class=sqlserver Repository_Class_Flavor=azure SqlServer_Server=reposserver.database.windows.net Database_Name=repository_db Database_User=repository_db_user Database_Password=@prompt ODBC_Driver=ODBC Driver 17 for SQL Server ``` - Db2 for Linux, Unix, and Windows ```plaintext dsshubserverconfig HTTP_Port=4340 Repository_Class=db2 Db2_DB2INSTANCE=db2inst Db2_INSTHOME=/db2/105 Database_Name=repository_db Database_User=repository_db_user Database_Password=@prompt ``` - MariaDB ```plaintext dsshubserverconfig HTTP_Port=4340 Repository_Class=mysql Repository_Class_Flavor=mariadb Database_Host=mariadbserver Database_Port=4104 Database_Name=repository_db Database_User=repository_db_user Database_Password=@prompt ``` - MySQL ```plaintext dsshubserverconfig HTTP_Port=4340 Repository_Class=mysql Repository_Class_Flavor=mariadb Database_Host=mysqlserver Database_Port=4104 Database_Name=repository_db Database_User=repository_db_user Database_Password=@prompt ``` - Oracle ```plaintext dsshubserverconfig HTTP_Port=4340 Repository_Class=oracle Oracle_Home=/oracle/1800 Oracle_SID=ORA1800 Database_User=repository_db_user Database_Password=@prompt ``` - PostgreSQL ```plaintext dsshubserverconfig HTTP_Port=4340 Repository_Class=postgresql Database_Host=postgresserver Database_Port=5435 PostgreSQL_Pglib=/postgres/95/lib Database_Name=repository_db Database_User=repository_db_user Database_Password=@prompt ``` - SQL Server ```plaintext dsshubserverconfig HTTP_Port=4340 Repository_Class=sqlserver SqlServer_Server=MYSERVER\DATASOURSOLUTIONS2016 Database_Name=repository_db Database_User=repository_db_user Database_Password=@prompt ODBC_Driver=ODBC Driver 17 for SQL Server ``` </details>-
Create the repository tables by using the command dssreposconfig:
dssreposconfig -c -
Supply the license by using the command dsslicense. The license for DSS must be supplied either by registering the hub system with a Data Source Solutions account (for consumption-based license) or by manually adding the license file (for subscription-based license). For more information on our licenses, see section Licensing.
{% tabs %}
{% tab label="Registering with Data Source Solutions Account" %}
<b>Since</b> v6.1.0/3-
Run the command dsslicense to register with Data Source Solutions account:
dsslicense -rSample output:
dsslicense: Data Source Solutions 6.1.0/21 (linux_glibc2.17-x64-64bit) To register this Hub System with a Data Source Solutions Account open: https://datasourcesolutions.ai/register-dss?fingerprint=Z117171&port=4343&cli=1 Additional commands will be provided at the end of the registration. -
Open the URL mentioned in the output of the above command in a web browser.
For registering the DSS Hub system with a Data Source Solutions account, the web browser must have access to datasourcesolutions.ai (35.236.237.87).
- If you already have a Data Source Solutions account, 1. Log in to Data Source Solutions account using your Data Source Solutions login credentials. 2. In the **Complete registration** dialog, click **Continue to DSS**. You will be redirected back into the DSS Hub System setup dialog. The current hub system will get registered and Data Source Solutions will send the license to the hub system. - If you do not have a Data Source Solutions account, 1. Specify the user and company details in the registration form. All fields are mandatory. 2. Click **Sign up**. 3. You will receive an email from Data Source Solutions to confirm your email address. In this verification email, click **Verify your Account**. 4. In the **Complete registration** dialog, click **Continue to DSS**. The commands that needs to be executed next are displayed in the **Complete registration** dialog. Sample output: 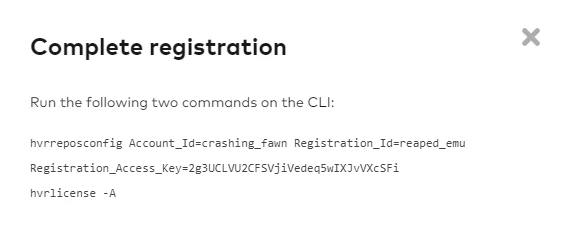 4. Set the repository properties [**Account_Id**](/docs/dss6-property-reference-repository-properties#accountid), [**Registration_Id**](/docs/dss6-property-reference-repository-properties#registrationid), and [**Registration_Access_Key**](/docs/dss6-property-reference-repository-properties#registrationaccesskey) by using the command [**dssreposconfig**](/docs/dss6-command-line-interface-command-reference-dssreposconfig): ```shell dssreposconfig Account_Id=<em>account_id</em> Registration_Id=<em>registration_id </em>Registration_Access_Key=<em>access_key</em> ``` <div class="callout callout-tip">You can copy-paste this command from the Complete registration dialog (in previous step).
-
-
  5. Acquire/fetch the license for the hub system from Data Source Solutions by using the command [**dsslicense**](/docs/dss6-command-line-interface-command-reference-dsslicense):

     ```plaintext
     dsslicense -A
     ```
{% /tab %}

{% tab label="Adding license manually" %}

  Run the command [**dsslicense**](/docs/dss6-command-line-interface-command-reference-dsslicense) to add the license file:
  ```shell
  dsslicense <em>license_file_name</em>
  ```

  <div class="callout callout-note">
The license file (.lic) must be available on your system.