Setting up DSS Hub from Browser - DSS 6 | Data Source Solutions Documentation

Documentation: Setting up DSS Hub from Browser - DSS 6 | Data Source Solutions Documentation

Setting up DSS Hub from Browser

This section describes the steps to set up an DSS Hub System from the web browser (UI), which includes specifying the connection details for the repository database, adding the license, configuring the hub system encryption wallet, creating a hub, creating the user(s) for accessing and operating DSS. Alternatively, you can perform the hub system setup from the Command Line Interface (CLI). For more information, see Setting up DSS Hub from CLI.

Prerequisites

Following are the prerequisites for setting up the DSS Hub System:

  • Create a repository database before proceeding with the hub system setup. For the list of DBMSs supported as repository database, see section Repository Database in Capabilities. For the access privileges, and other configuration required for using the supported DBMS as repository database, see section Hub Repository Database Requirements. For example, an Oracle database can serve as a repository database.

    Sample SQL statements to create a repository database in Oracle.
    create user datasourcesolutions_demo
    identified by datasourcesolutions 
    default tablespace users 
    temporary tablespace temp
    quota unlimited on users; 
    

    Configure the privileges for the Oracle repository:

    grant create session to datasourcesolutions_demo;
    grant create table to datasourcesolutions_demo; 
    grant create trigger to datasourcesolutions_demo; 
    grant create procedure to datasourcesolutions_demo; 
    grant execute on dbms_alert to datasourcesolutions_demo;
    
  • One of the following:
    • For registering the DSS Hub System with a Data Source Solutions account (Consumption-based Pricing), the web browser must have access to datasourcesolutions.ai (35.236.237.87). Only Data Source Solutions accounts with the Account Administrator role can register a hub system.
    • For adding the DSS license manually (Usage-Based Subscription), the license file (.lic) must be available on your system.

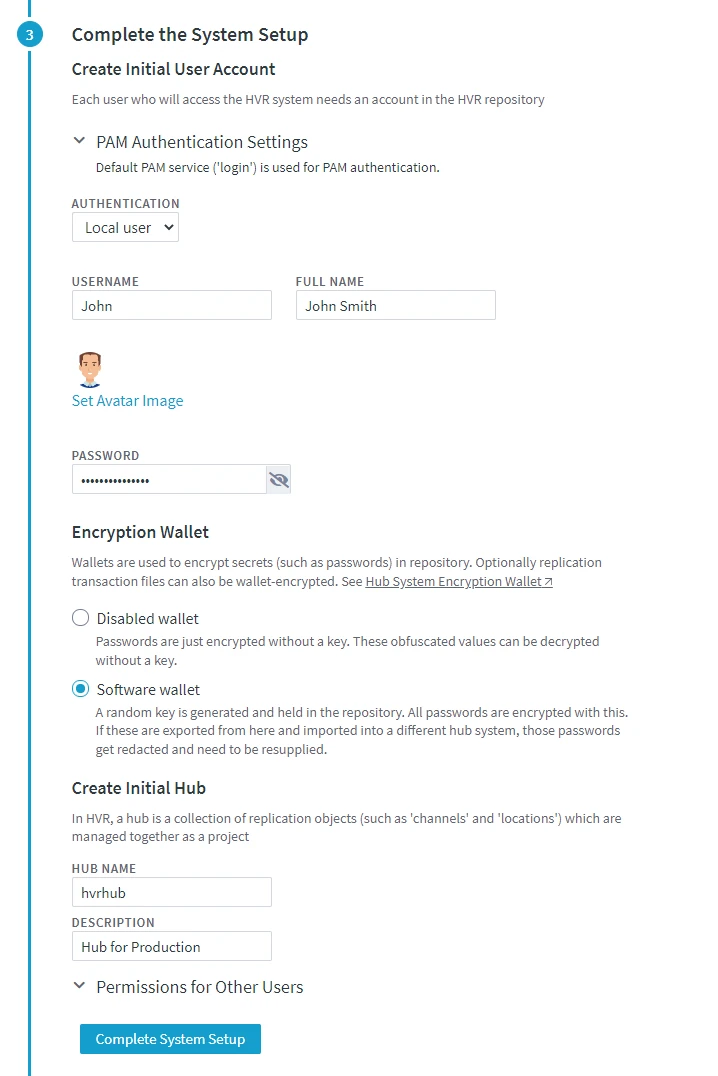
Setting Up DSS Hub System

Perform the following steps to set up the DSS Hub System in a web browser:

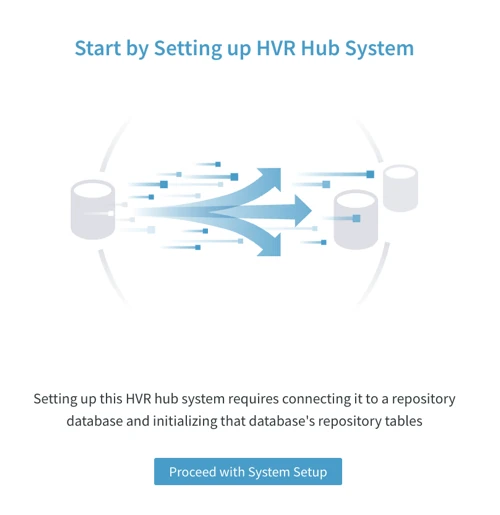
  1. On the System Setup page, click Proceed with System Setup.

    SC-Dss-Configure-SettingupHubServer-FromBrowser_SystemSetup_Start.png

  2. Read the license agreement, click Accept and Proceed.

    SC-Dss-Configure-SettingupHubServer-FromBrowser_LicenseAgreement.webp

  3. Select the DBMS type of the repository database (see Prerequisites).

    SC-Dss-Configure-SettingupHubServer-FromBrowser_ConnectionToRepository.webp

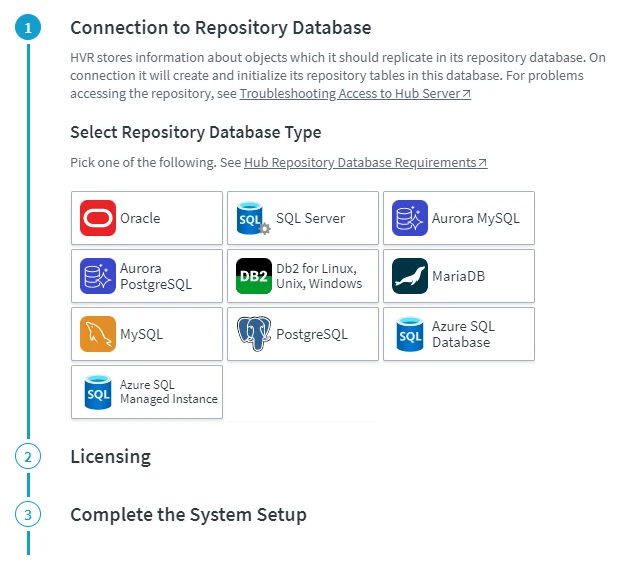
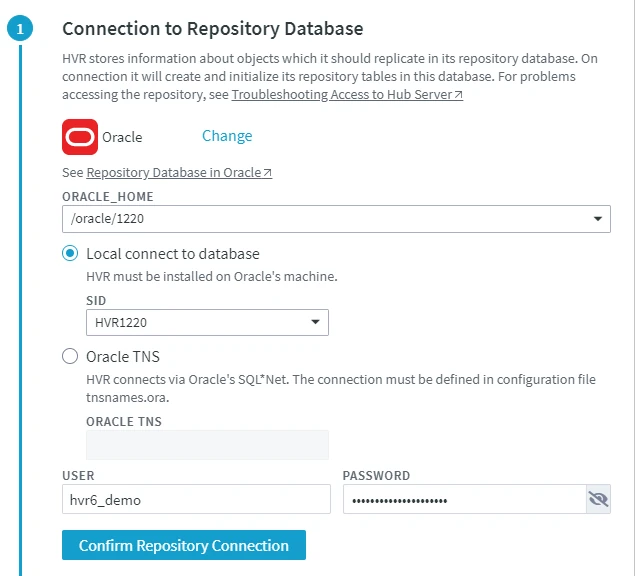
  4. Provide details required to establish the connection to the repository database. Click Confirm Repository Connection.

The image below shows the connection properties required for creating the connection to an Oracle database. The set of properties will differ depending on the location type you are connecting to. For more information on the connection properties for each location type, see section Hub Repository Database Requirements.

<div class="callout callout-note">

If the managed secrets feature is enabled, option USE TOKEN INSTEAD is displayed in the fields designated for entering secrets.

![SC-Dss-Configure-SettingupHubServer-FromBrowser_SystemSetup_RepositoryDatabase.webp](/static/docs/docs/dss6/install-and-upgrade/configure/hub/setting-up-hub-from-browser/_assets/SC-Dss-Configure-SettingupHubServer-FromBrowser_SystemSetup_RepositoryDatabase.webp)  
  1. License for DSS must be supplied either by registering the hub system with a Data Source Solutions account (for Consumption-Based Pricing) or by manually adding the license file (for Subscription-based license). For more information on our licenses, see section Licensing.
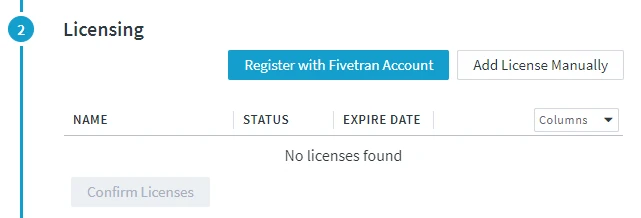
    SC-Dss-Configure-SettingupHubServer-FromBrowser_AddLicense.webp

    {% tabs %}

    {% tab label="Register with Data Source Solutions Account" %}

    <b>Since</b> v6.1.0/3

    1. Click Register with Data Source Solutions Account.

For registering the DSS Hub System with a Data Source Solutions account, the web browser must have access to datasourcesolutions.ai (35.236.237.87).

2. On the Data Source Solutions account creation page,
    - If you already have a Data Source Solutions account,
       1. Log in to Data Source Solutions account using your Data Source Solutions login credentials.
       2. In the **Complete registration** dialog, click **Continue to DSS**. You will be redirected back into the DSS Hub System setup dialog. The hub system will get registered and Data Source Solutions will send the license to the hub system.
      
    - If you do not have a Data Source Solutions account,
         1. Specify the user and company details in the registration form. All fields are mandatory.
         2. Click **Sign up**.
         3. You will receive an email from Data Source Solutions to confirm your email address. In this verification email, click **Verify your Account**.
         4. In the **Complete registration** dialog, click **Continue to DSS**. You will be redirected back into the DSS Hub System setup dialog. The hub system will get registered and Data Source Solutions will send the license to the hub system.

    <div class="callout callout-note">

To manage your Data Source Solutions account or view your billing and usage, click on the Registration ID displayed in the Licensing dialog. For more information about using the Data Source Solutions dashboard and account management, see Account Settings in Data Source Solutions documentation.

{% /tab %}

{% tab label="Add License Manually" %}

 1. In the **Licensing** dialog, click **Add License Manually**.
    <div class="callout callout-note">

The license file must be available on your system.

2. Browse and select the license file (**.lic**) and click **Open**. The license will be added to the current hub system. 3. Click **Confirm Licenses**.

{% /tab %}

{% /tabs %}

<details><summary>Information about other options displayed in this step/screen. These options are displayed only after the hub system is registered with a Data Source Solutions account or a license is added manually.</summary>

#### Deleting License

To delete a license:

1. Click **Delete** displayed in the respective license's row.
2. Click **OK** in the confirmation dialog.

#### Deleting Data Source Solutions Account Registration

To delete the Data Source Solutions account registration for the current hub system:

1.  Click **Delete Registration**.
2.  Click **OK** in the confirmation dialog.

<div class="callout callout-important">

Deleting a Data Source Solutions account registration only removes the account registration information from the current hub's repository. This will not delete the Data Source Solutions account itself.

However, deleting a Data Source Solutions account registration will immediately stop uploading the <a href="/docs/getting-started-consumption-based-pricing#monthlyactiverows" rel="nofollow">Monthly Active Rows (MAR)</a> data and the auto-renewal of the license will be stopped (so the license will expire after seven days).
#### Acquiring Data Source Solutions Account License

If a license that was added using the Data Source Solutions account is deleted, you can fetch that license from your Data Source Solutions account by clicking **Acquire Data Source Solutions Account License**. The option to acquire Data Source Solutions account license is not displayed if the Data Source Solutions account registration is already deleted using the **Delete Registration** option.

</details>
  1. Create a user account to access and manage the DSS Hub System:

    1. Select the user AUTHENTICATION method. For more information about user authentication methods, see User Authentication.
      The available options are:

      • Local user

      • PAM user Linux

        PAM Authentication Settings

The option PAM Authentication Settings is displayed only for the DSS Hub System installed on Linux and is applicable only for the user whose AUTHENTICATION is set to PAM user.

        For users with **PAM** authentication, the default PAM service is **login**. To use a different PAM service, you need to configure the **PAM Authentication Settings**:

        -   **Default service ('login')** `default`: Use the default PAM service **login** for authentication.

        -   **Specific service** : Use a user-specified PAM service for authentication instead of the default service. Enter the name of a specific PAM service that you want to use for authentication.

        -   **Execute PAM authenticator as different user** : Run the PAM authenticator as the specified **USER** instead of the operating system user under which the DSS Hub System is running.

            <div class="callout callout-important">

This user must have privilege to run the following command: shell $ sudo -n -u <em>PAM_Sudo_User</em> -- $DSS_HOME/lib/dssauthpam <em>PAM_Service</em>

        ![SC-Dss-Configure-SettingupHubServer-FromBrowser_PAM_Auth_Settings.webp](/static/docs/docs/dss6/install-and-upgrade/configure/hub/setting-up-hub-from-browser/_assets/SC-Dss-Configure-SettingupHubServer-FromBrowser_PAM_Auth_Settings.webp)

        </details>

    -   **Plugin** **user**

        <div class="callout callout-important">

This user authentication method is not available for the first user created during the hub system setup.

    -   **Windows user**
        `Windows`

2.  Specify a name in **USERNAME**.

3.  Specify the **FULL NAME** of the user for whom this account is being created.

4.  Optionally, set an avatar image for the user account.

5.  Specify a **PASSWORD** for the user account.

    <div class="callout callout-important">

The minimum password length for Local user must be 10 characters.

<div class="callout callout-note">
  1. Configure the DSS Hub System encryption wallet. It is mandatory to select one of the following options:

    • Disabled wallet: Wallet/password-encryption is disabled. When wallet is disabled, all user passwords in DSS are obfuscated using a password obfuscation method and stored in the repository database.

    • Software wallet: Use Software wallet for password encryption. When Software wallet is used, all user passwords in DSS are encrypted using a random key and stored in the repository database.

  2. Create a hub:

    1. Specify a name for the hub in HUB NAME.

    2. Optionally, specify a DESCRIPTION for the hub.

  3. Optionally, specify the default access permissions for users that can be added to the current hub in the future. The access permissions for a user can be managed from the Permissions tab on the System page.

  4. Click Complete System Setup. The DSS Hub System will exit the 'setup mode' and start running in the regular mode. The Start page will open automatically, where you need to enter the login credentials and then start building a replication channel.

    SC-Dss-Configure-SettingupHubServer-FromBrowser_UserAccount.webp