Installing DSS Hub on Windows using Installer - DSS 6 | Data Source Solutions Documentation
Documentation: Installing DSS Hub on Windows using Installer - DSS 6 | Data Source Solutions Documentation
Installing DSS Hub on Windows using Installer
This section describes the requirements and step-by-step instructions on how to install the DSS Hub System on Windows using installer.
For installing the DSS Hub on Windows using zip file, see Installing DSS Hub on Windows using Zip File.
For installing DSS Agent on Windows using installer or zip file, see Installing DSS Agent on Windows using Installer or Installing DSS Agent on Windows using Zip File respectively.
The installation file for Windows is available for download in .exe and .zip format. The compressed file (.zip) distribution is normally used as an alternative for the Windows executable based (.exe) distribution. Also, the installation steps are different on both formats.
Requirements
Following are the prerequisites for installing the DSS Hub System on Windows:
-
Sufficient disk space
Ensure sufficient disk space is available on the machine where this installation will be performed. For more information, see Hub Disk Requirements. -
Compatibility
Check whether the DSS version is compatible with the operating system and DBMS. Refer to the relevant Supported Platforms section or read the COMPATIBILITY section in the release notes (available under the Downloads tab in the Data Source Solutions dashboard). -
Installation file
DSS Hub System installation file for Windows (e.g. datasourcesolutions-6.1.0_21-hub_and_agent-windows-x64-64bit_ga_patch-setup.exe). This file can be downloaded from the Downloads tab in the Data Source Solutions dashboard. For more information, see Downloading DSS. -
Database for DSS repository
DSS uses its repository database to store the replication definitions (which tables must be replicated between which 'locations') as well as run-time status (which jobs are currently running). For databases supported as a repository, see section Repository Database. -
Access to source and target locations
For the DSS Hub System to access a source or target database directly, the database connectivity (e.g. ODBC drivers) must be installed on the hub machine. For more information, see Source and Target Requirements. -
Perl version 5.6 or higher must be installed. If Perl is installed after the installation of DSS Hub System, then the hub server service must be destroyed and recreated.
-
Windows user account privileges.
-
Elevated user account privilege is required for running the DSS Hub System executable/installer. Normally this means the user must supply an administrator password interactively.
-
The user account (e.g., datasourcesolutions) that will operate the DSS Hub System must have the Log on as a service policy enabled.
Click here for the steps to configure the user policy
User account policies can be managed using the Windows Local Security Policy console accessible from Control Panel ▶ Administrative Tools. Alternatively, you can use the secpol.msc command to open this console directly. For more information about enabling this policy, refer to the Microsoft documentation.
- In the Local Security Policy window, expand Local Policies and click User Rights Assignment.
- Double-click the Log on as a service policy available in the list of policies on the right pane.
- In the Log on as a service Properties dialog, click Add User or Group to display the Select Users, Computers, Accounts, or Groups dialog.
- In the Enter the object names to select field, enter the user account name that requires this policy, and click OK.
- Click OK.
-
Install Steps
Perform the following steps in the user account that will be used for operating the DSS Hub System:
-
Run the DSS Hub System installation file (e.g. datasourcesolutions-6.1.0_21-hub_and_agent-windows-x64-64bit_ga_patch-setup.exe).
-
Click Next in the installation wizard dialog.

-
Read the License Agreement, select I accept the agreement and click Next.

-
Specify the installation directory for DSS_HOME, DSS_CONFIG, and DSS_TMP and click Next.

-
Click Next to create the program folder for DSS Hub System.

-
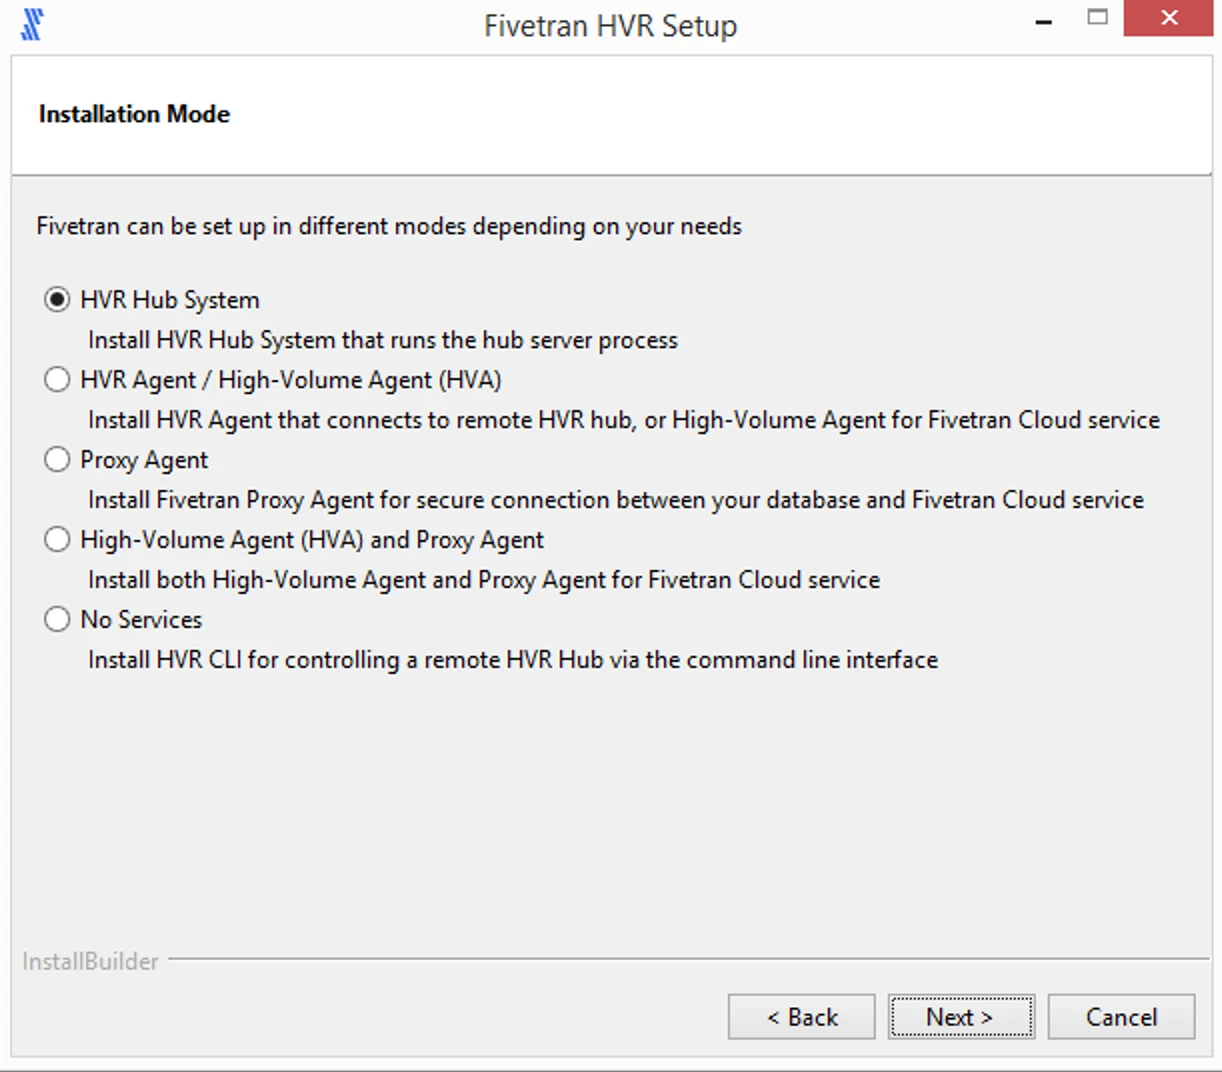
Select DSS Hub and click Next.
-
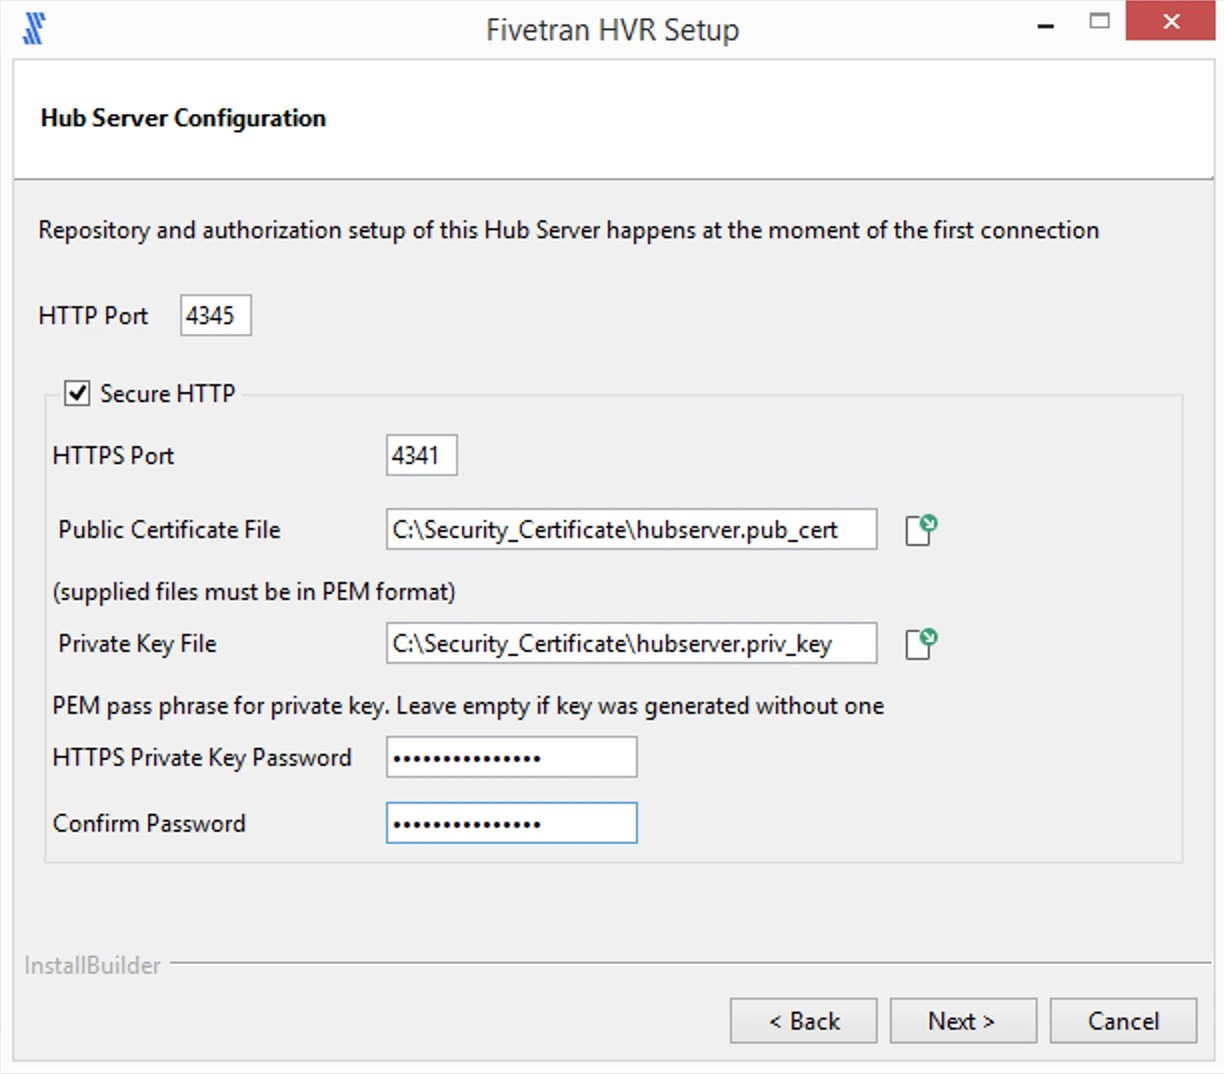
Configure the TCP listening port, on which the DSS Hub Server will listen for connection request.
The secure HTTP protocol (HTTPS) is preferred, but this requires a private-key and public-certificate. This pair of files must have been generated for the hub machine's DNS host name, and signed by a certificate trusted by web browsers.
- If HTTPS private-key and public-certificate files are not available, configure HTTP:
-
Enter value for HTTP Port and click Next.
- Port 4340 is recommended for DSS's use of HTTP protocol. - Browser may give warnings that HTTP is insecure. These warnings must be ignored (until HTTPS is configured).
 - If private-key and public-certificate files are available (e.g. **mycert.priv_key** and **mycert.pub_cert**), use them to configure HTTPS: <div class="callout callout-note">- Port 4341 and 4340 is recommended for DSS's use of HTTPS and HTTP protocol respectively. - If HTTPS is configured, then connections to the (unencrypted) HTTP port are simply redirected to the HTTPS port.
-
- If HTTPS private-key and public-certificate files are not available, configure HTTP:
1. Enter value for **HTTP Port**.
2. Select **Secure HTTP**.
3. Enter value for **HTTPS Port**.
4. Browse and select **Public Certificate File** and **Private Key File**.
5. Specify the pass phrase associated with the key file in the **HTTPS Private Key Password** and **Confirm Password** fields, if applicable.
6. Click **Next**.
-
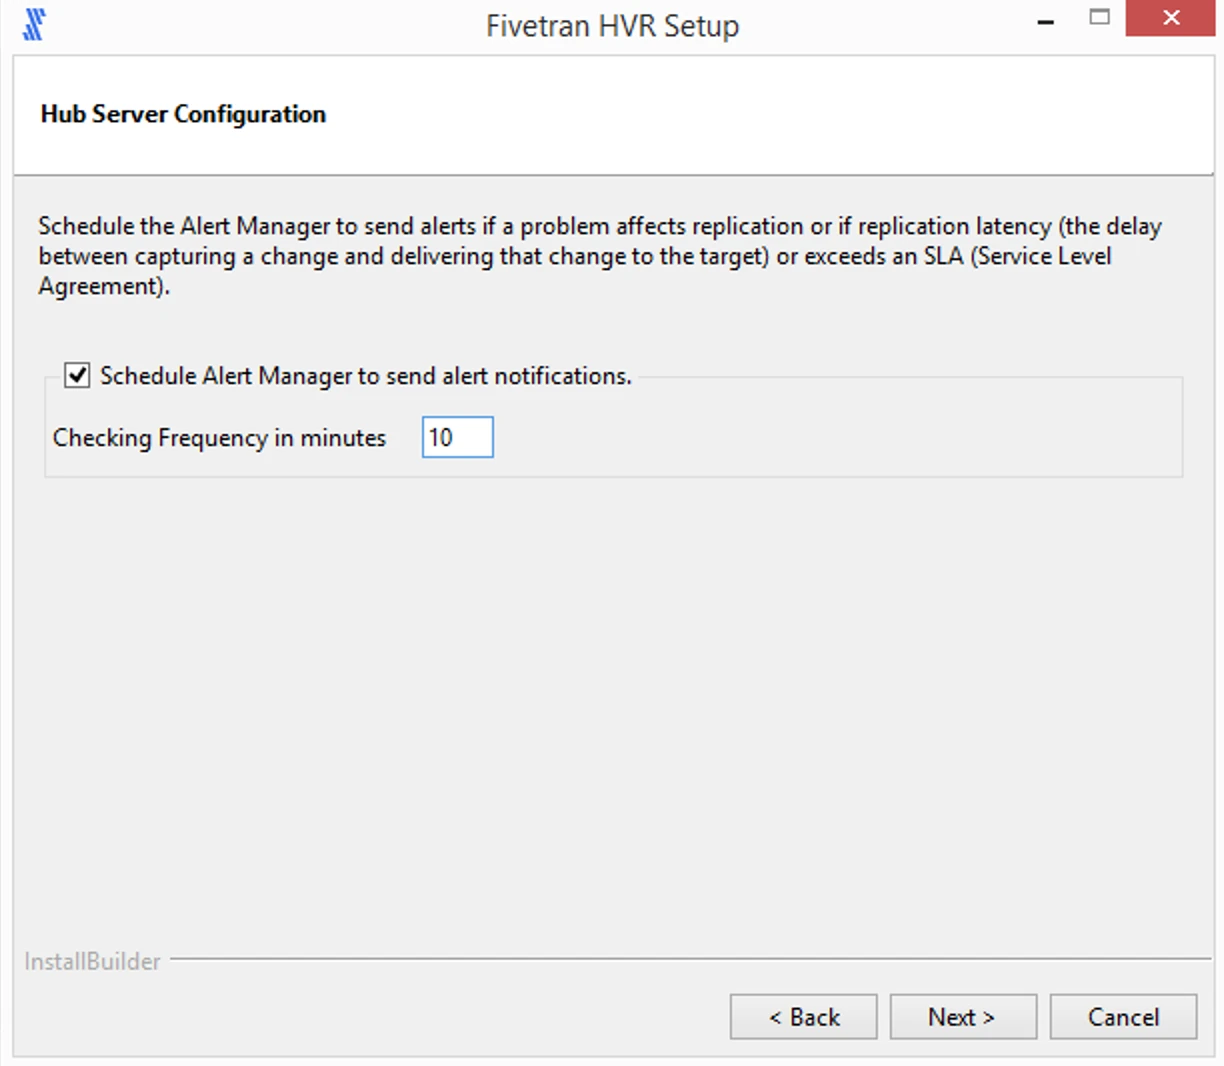
Click Next to create Windows Scheduled Tasks for running the dssalertmanager at a scheduled intervals.
DSS can send alert notifications if a problem affects replication. Alerts can also be configured to notify if the replication latency (the delay between capturing a change and delivering that change to the target) exceeds an SLA (Service Level Agreement). Alerts are sent by a separate process called dssalertmanager, which should be scheduled to run at a fixed frequency (e.g. every 10 minutes).
-
Select the user account for running the DSS Hub Server services.
-
If Specified user is selected, enter values for User, Password, Confirm Password and click Next.

-
If Local System account is selected and click Next.

-
-
Select Add DSS_HOME, DSS_CONFIG and DSS_TMP (if required), and click Next.
This is to set the environment variables DSS_HOME, DSS_CONFIG, and DSS_TMP in your operating system.
-
Click Next to initiate the installation.

-
After the installation is complete, click Finish.
The initial setup for the DSS Hub System will automatically open in the default browser. For more information about initial set up of the hub server, see Setting up DSS Hub from Browser.
When DSS Hub System is installed using the installer, the DSS Hub Server process is automatically added to Windows Startup. No additional configuration is needed for the service to start after a system reboot.
For the steps to configure connection via proxy server, see section Configuring Connection via Proxy Server on Windows.
See Also
-