Comparing Data - DSS 6 | Data Source Solutions Documentation
Documentation: Comparing Data - DSS 6 | Data Source Solutions Documentation
Comparing Data
Option Compare Data allows you to compare data in two or more locations in a channel. It supports comparing both database and file locations. For more information, see the Compare concept page.
Option Compare Data is equivalent to the dsscompare CLI command.
This option is available on the following pages:
- Channel Details: the Compare Data button at the top right of the page.
- Locations: the Compare Data option under the More Options menu
 at the top right of a page.
 - Location Details: the Compare Data option under the More Options menu related to each channel in the Channel Membership pane.
- Tables: the Compare Data option under the More Options menu at the top right of a page.
- Table Details: the Compare Data option under the More Options menu at the top right of a page.
- Event Details: (related to a compare event): the Repeat Compare button at the to right of the page.
- Jobs: the New Compare option under the More Options menu related to a compare job.
The Compare Data option may appear disabled in certain cases, for example, on the Channel Details page, if no locations are added to a channel. On the Tables page, you need to select one or more tables to enable the option, etc. When you hover over the disabled option, a tooltip will appear with an appropriate explanation.
The option opens the Compare Data dialog allowing you to choose specific locations and tables to be compared and configure different options to customize the compare operation. For detailed information about each of the options available in the dialog, see section Compare Options below.
Compare Options
| Option | Description | |
|---|---|---|
| Locations |
Select the source and target location(s) in which the tables will be compared. The location selected in the SOURCE field is also called a 'read' location, while the location in the TARGET field is called a 'write' location. The 'read' and 'write' concepts are used to define the behavior of the compare operation, in particular the location where the actual data comparison is performed. For example, if you are comparing data between different types of DBMSes, an ambiguity may occur due to certain data type coercions. The coercion feature maps an empty string from certain DBMSes into a null value in the Oracle varchar data type. For example, if an Ingres location (ing) contains an empty string mapped to a null in an Oracle location (ora), then should we report that these tables are the same or different? The Compare Data option allows both behaviors by applying the sensitivity of the 'write' location rather than the 'read' location. The 'read' location is passive: the data is piped from the ‘read' location to the ‘write’ location, and the work of comparing the data is performed in the ‘write’ location. This means that comparing location ing as a source and location ora as a target will report that the tables are identical, but comparing ora as a source and ing as a target will say the tables are different. |
|
| Tables |
Select the specific tables to be compared. |
|
| Table Checksums Only | Enables the bulk compare mode. This comparison mode computes a checksum for every row based on all data values, with a final checksum computed across all the checksums for every row. The compare result is determined by whether or not the checksum from the source location matches the checksum from the target location. DSS will report a difference between the source and target tables if the checksum is different, irrespective of whether the reported row count is identical. The bulk mode runs on a database server and only passes the checksum to the hub so it is very efficient in terms of network traffic. However, the bulk mode provides limited detail on the difference. Only the row count is reported, and whether or not the checksum values came out identical. If this option is not enabled, thedefaultcompare mode is row by row. In this mode, DSS extracts the data from a source (read) location, compresses it and transfers the data to a target (write) location(s) to perform a row by row comparison. Each individual row is compared to produce a 'diff' result. |
|
| Table Row Counts Only | Only count rows, do not compare data.
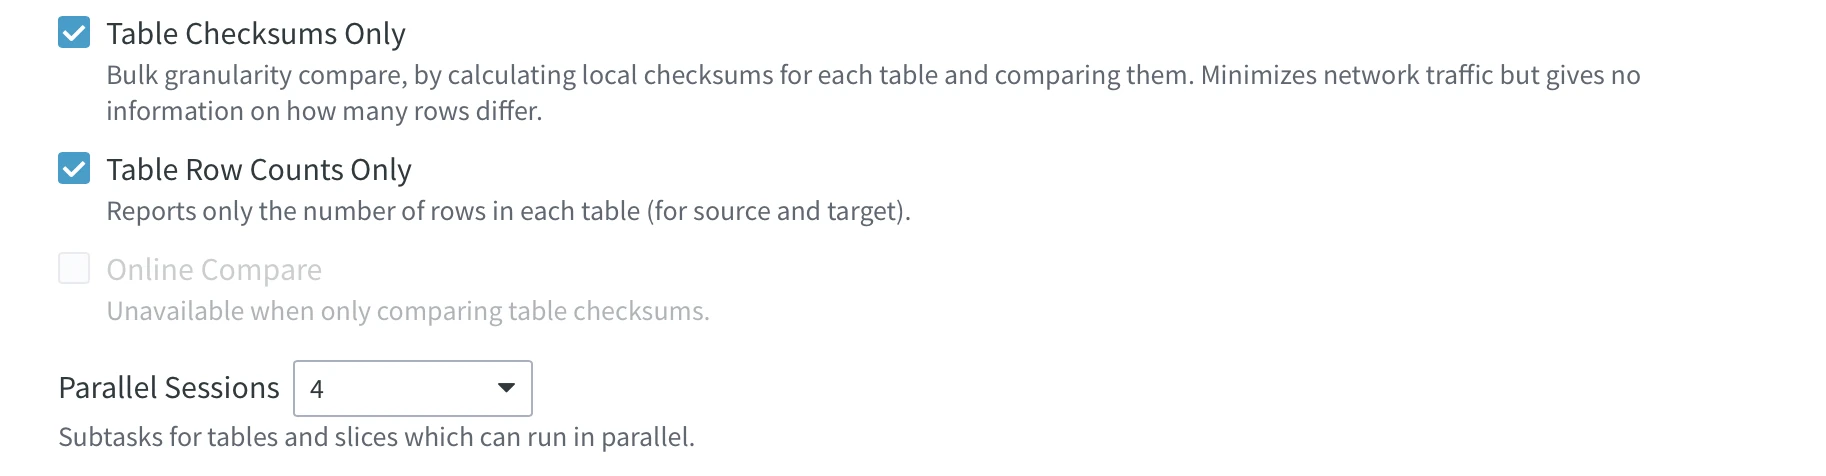
This option is only displayed when option Table Checksums Only is selected. |
|
| Keep Difference Files | Verbose. This option creates binary diff files containing individual differences detected. Section Analyzing Diff File explains how to view and interpret the contents of a diff file. This option is only displayed for the row by row compare mode (not available when option Table Checksums Only is selected). |
|
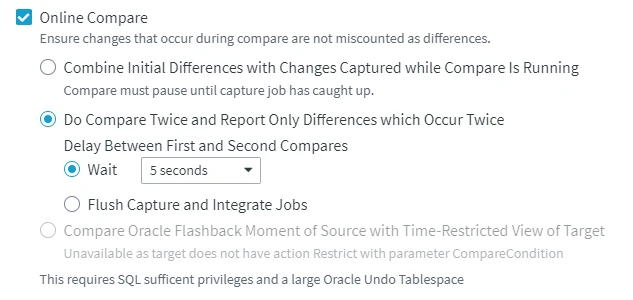
| Online Compare |
Performs live compare between locations where data is rapidly changing. This option is only displayed for the row by row compare mode (not available when option Table Checksums Only is selected).
The online compare has the following modes:
|
|
| Parallel Sessions | Parallelism for sessions. Perform compare for different tables in parallel using |
|
| File Prereaders per Table | File prereaders per table. Define the number of prereader subtasks per table while performing a direct file compare. For more information, see section Direct File Compare. This option is only displayed if the source or target location is a file location. |
|
| Contexts | This controls whether actions defined with parameter Context are effective or are ignored. Defining an action with Context can have different uses. For example, if action Restrict with parameters CompareCondition="{id}>22" and Context=qqq is defined, then normally all data will be compared, but if context qqq is enabled ( Action ColumnProperties can also be defined with parameter Context on both source and target. This way, the parameter CaptureExpression will only be activated if a certain context is supplied. For more information, see the concept page - Refresh and Compare Contexts.This option is only displayed if you have an action (CollisionDetect, ColumnProperties, Environment, FileFormat, Integrate, Restrict, TableProperties, Transform) defined with parameter Context. |
|
| Variables | Supply value for the compare restrict condition or add a new variable. |
|
Slicing |
The slicing section allows you to configure the slicing options. For more information, see the Slicing concept page. Table Slicing dialog can be invoked by clicking the Add Table button. In this dialog, you can choose the slicing separately for each table in your source. 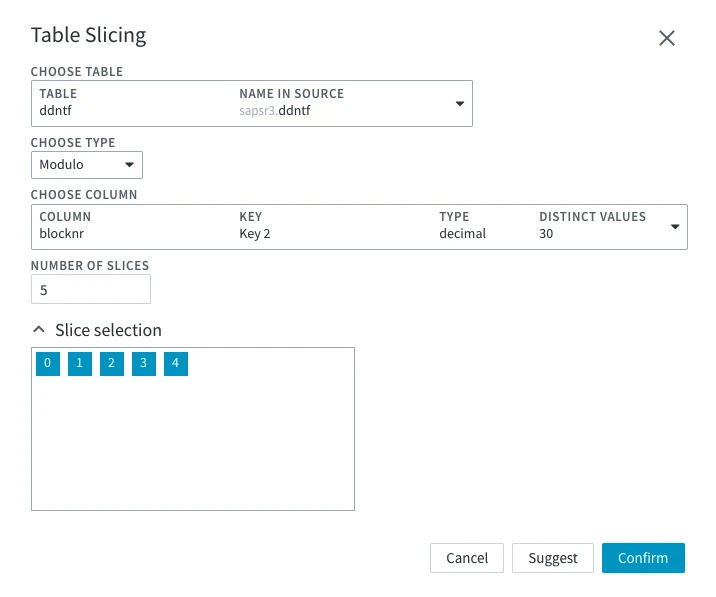
|
|
|
Choose Table
|
Table for which the slicing is to be configured. | |
|
Choose Type
|
Types of slicing that can be applied to the table:
|
|
|
Choose Column
|
The table will be sliced by the chosen column's data. Slicing on a non-key column can cause errors if an update moves a row between slices. The Distinct Values field is shown if dbms_stats gathering is enabled for the database. The Distinct Values column is only available for Oracle. This option is available when Modulo or Boundary slicing type is chosen. |
|
|
Number of Slices
|
The number of slices the table will be divided into. | |
|
Boundaries
|
Set the boundaries for each slice. To set them, you have to know the data in your table. This option is available when the Boundary slicing type is chosen. |
|
| Data Type | Choose the data type for slicing. To set it, you have to know the data in your table. This option is available when the Boundary slicing type is chosen. |
|
| Series Values | Set values for each slice. To set them, you have to know the data in your table. This option is available when the Series slicing type is chosen. |
|
|
Slice Selection
|
Choose which slices you want to perform the job on. For example, you have chosen Boundary slicing and have set the boundaries to 1000, 3500, and 6000. In this case, you will have 5 slices: with values 0 to 999, 1000 to 3499, 3500 to 5999, and 6000 to the end of the table. You can choose only the second and third slices so that the Refresh job is performed on rows with values 1000 to 5999. |
|
The Slicing Suggestions dialog can be invoked by:
In the Slicing Suggestions dialog, you can configure the slicing settings for the current job. 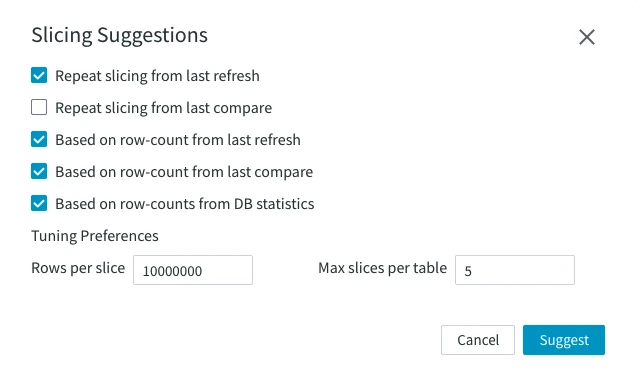
This option is not supported since 6.3.0/0. |
||
| Slicing Suggestions | Repeat a previous slicing job or base it upon certain data:
This option is not supported since 6.3.0/0. |
|
| Tuning Preferences | Rows per slice – sets the number of rows per slice. Set to 10 million by default. Max slices per table – sets the maximum number of suggested slices per table. By default, the number is set to 5.This option is not supported since 6.3.0/0. |
|
| Advanced Compare Options |
Only Count Certain Differences Available options are:
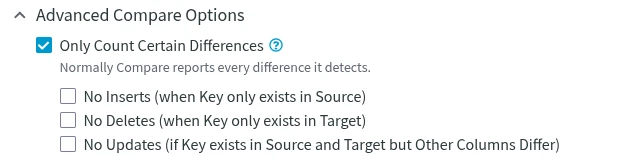
This option is only displayed for the row by row compare mode (not available when option Table Checksums Only is selected). In the CLI, this option corresponds to the |
|
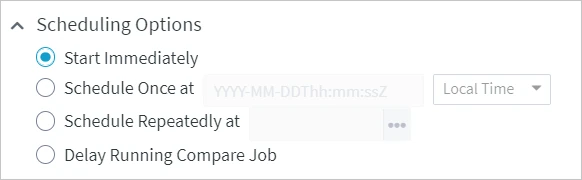
| Scheduling Options |
Schedule the time to run the compare job. Available options are:
|
|
| Show Equivalent DSS Command Line | Show CLI command equivalent to the UI options selected in the dialog. You can use (copy and paste) the equivalent line to manually repeat or perform this operation later on. In cases when the command line equivalents are different for Linux/Unix and Windows, both options are shown. Select option Include -R (Remote hub server) argument to include the parameters for accessing a hub server that runs on a remote machine. For more information about this CLI option, see dsscompare-R. |
|
Viewing Compare Results
Clicking the Compare Data button in the Compare Data dialog will start the compare job. You will see the following notification at the top of the page.

Once the compare job has started, the following notification will appear at the top of the page. Click the View Compare event link to open the Event Details page displaying detailed information about the compare event.

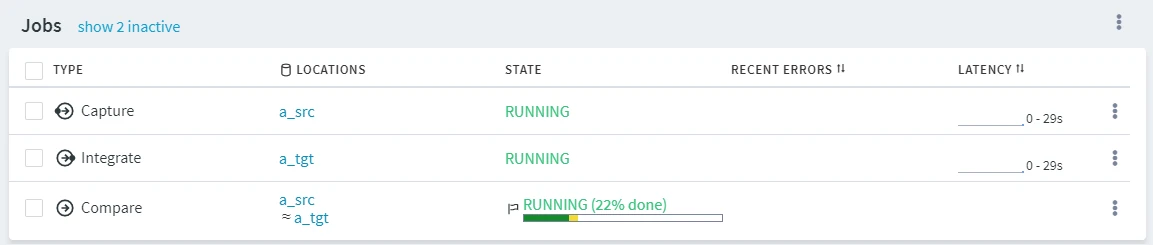
On the Channel Details page, the compare job state is displayed on the Jobs pane. To open the Event Details, click the More Options icon ![]() related to the compare job and select Go To Event.
related to the compare job and select Go To Event.
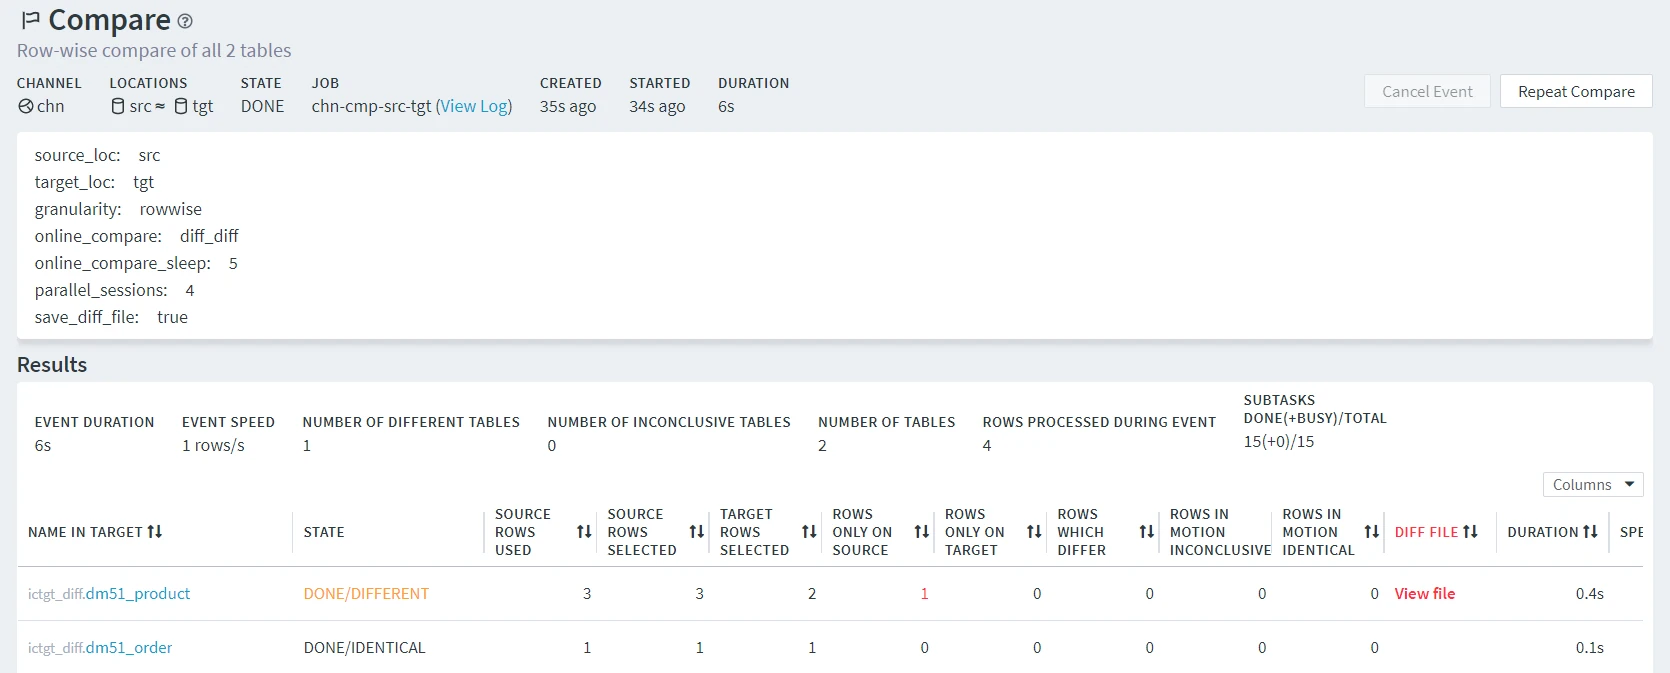
The following is an example of the Event Details page showing a compare event.
-
The top pane shows information about the channel and location(s) related to the compare event, the event state, the job name associated with the event, the time the event was started and the event duration.
-
The middle pane shows additional details related to the configuration parameters set in the Compare Data dialog, such as granularity, the number of parallel sessions, etc.
-
The Results pane shows the compare statistics for each table involved in the compare event, such as the number of rows in source and target that were compared, rows that differ, and others. The View file link opens the View Diff File dialog that allows to inspect a diff file containing the list of differences detected. Section Analyzing Diff File explains how to view and interpret the contents of the diff file. For details on each parameter in the Results pane, see section Refresh and Compare Results.